Rabu, 11 Januari 2012

Tugas Membuat Nilai Siswa (Web Design)

0 komentar
1. Membuat database
Contoh : ade_11080965

2. Membuat tabel
Contoh : nilai_siswa

Isi field seperti gambar dibawah ini :
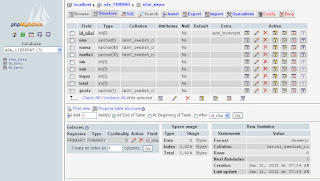


3.lalu buatlah tampilan inputan untuk Nilai Siswa :
Listing :


<body>
<form name="form1" method="post" action="data_nilai.php">
<table width="75%">
<tr>
<td width="23%">Nim</td>
<td width="7%">
<div align="center">:</div></td>
<td width="70%">
<input name="nim" type="text" id="nim"></td>
</tr>
<tr>
<td>Nama</td>
<td><div align="center">:</div></td>
<td><input name="nama" type="text" id="nama"></td>
</tr>
<tr>
<td>MataKuliah</td>
<td><div align="center">:</div></td>
<td><select name="matkul">
<option>webpro</option>
<option>logika</option>
<option>sisfo</option>
</select></td>
</tr>
<tr>
<td>UTS</td>
<td><div align="center">:</div></td>
<td><input name="uts" type="text" id="uts"></td>
</tr>
<tr>
<td>UAS</td>
<td><div align="center">:</div></td>
<td><input name="uas" type="text" id="uas"> </td>
</tr>
<tr>
<td>TUGAS</td>
<td><div align="center">:</div></td>
<td><input name="tugas" type="text" id="tugas"></td>
</tr>
<tr>
<td colspan="3"><div align="center">
<input name="proses" type="submit" id="proses" value="proses">
<input name="simpan" type="submit" id="simpan" value="simpan">
<input name="batal" type="reset" id="batal" value="batal">
</div></td>
</tr>
</table>
</form>
</body>


4. Buat koneksi ke database

Listing koneksi :

<?php
$host='localhost';
$user='root';
$pass='password';
$db='ade_11080965';
$ok=mysql_connect($host,$user,$pass) or die ('gagal konek'.mysql_error());
mysql_select_db($db,$ok);
?>


5. Buat Perintah SQL untuk penyimpanan ke database

Listing :

<body>
<?
include "koneksi.php";
$id_nilai=$_post["id_nilai"];
$nim=$_post["nim"];
$nama=$_post["nama"];
$uts=$_post["uts"];
$uas=$_post["uas"];
$tugas=$_post["tugas"];
$total=$_post["total"];
$grade=$_post["grade"];
$input="insert into
nilai_siswa(id_nilai,nim,nama,uts,uas,tugas,total,grade)value('$id_nilai','$nim','$nama','$uts','$uas','$tugas','$total','$grade')";
$query=mysql_query($input);
if($query)
{
echo"<pre>id_nilai : $id_nilai</pre>";
echo"<pre>nim : $nim</pre>";
echo"<pre>nama : $nama</pre>";
echo"<pre>uts : $uts</pre>";
echo"<pre>uas : $uas</pre>";
echo"<pre>tugas : $tugas</pre>";
echo"<pre>total : $total</pre>";
echo"<pre>grade : $grade</pre><br>";
echo"Data Diatas Telah Sukses Tersimpan<br>";
echo"<a href=data_nilai.php>[browse data]</a>";
}
else
{
echo "gagal tersimpan" <br>
echo "<a href=input_nilai.php[input data]</a>";
}
?>
</body>


6. Buat design untuk menampilkannya :

<body>
<?
include "koneksi.php";
$perintah="select *from nilai_siswa";
$hasil=mysql_query($perintah);
while($row=mysql_fetch_array($hasil)
{
$id_nilai=$row[id_nilai];
$nim=$row[nim];
$nama=$row[nama];
$matkul=$row[matkul];
$uts=$row[uts];
$uas=$row[uas];
$tugas=$row[tugas];
$total=$row[total];
$grade=$row[grade];
}
{
echo"<pre>id_nilai :$id_nilai</pre>";
echo"<pre>nim :$nim</pre>";
echo"<pre>nama :$nama</pre>";
echo"<pre>matku :$matkul</pre>";
echo"<pre>uts :$uts</pre>";
echo"<pre>uas :$uas</pre>";
echo"<pre>tuagas :$tugas</pre>";
echo"<pre>total :$total</pre>";
echo"<pre>grade :$grade</pre><br>";
}
echo"<a href=input_nilai.php>back</a>";
?>
</body>


Selesai..
Read more ►

Tugas Membuat Data Buku (Web Design)

0 komentar
1. Membuat database
Contoh : ade_11080965

2. Membuat tabel
Contoh : tb_buku

Isi field seperti gambar dibawah ini :


3. Buat design untuk input data buku seperti gambar dibawah ini :


Listing input data buku :

<body>
<form id="form1" name="form1" method="post" action="save_data_buku.php">
<table width="545" border="0">
<tr>
<td width="284">kodebuku</td>
<td width="26">:</td>
<td width="221"><label>
<input name="kode" type="text" id="kode" />
</label></td>
</tr>
<tr>
<td>judul</td>
<td>:</td>
<td><label>
<input name="judul" type="text" id="judul" />
</label></td>
</tr>
<tr>
<td>jenis</td>
<td>:</td>
<td><label>
<select name="jenis" id="jenis">
<option>Jaringan</option>
<option>Web Programming</option>
<option>Java</option>
</select>
</label></td>
</tr>
<tr>
<td>pengarang</td>
<td>:</td>
<td><label>
<input name="pengarang" type="text" id="pengarang" />
</label></td>
</tr>
<tr>
<td>penerbit</td>
<td>:</td>
<td><label>
<input name="penerbit" type="text" id="penerbit" />
</label></td>
</tr>
<tr>
<td>sinopsis</td>
<td>:</td>
<td><label>
<textarea name="sinopsis" id="sinopsis"></textarea>
</label></td>
</tr>
</table>
<p>
<label>
<input name="submit" type="submit" id="submit" value="kirim" />
</label>
<label>
<input name="reset" type="reset" id="reset" value="cancel" />
</label>
</p>
</form>
</body>


4. Buat koneksi ke database

Listing koneksi :

<?php
$host='localhost';
$user='root';
$pass='password';
$db='ade_11080965';
$ok=mysql_connect($host,$user,$pass) or die ('gagal konek'.mysql_error());
mysql_select_db($db,$ok);
?>


5. Buat Perintah SQL untuk penyimpanan ke database

Listing :

<?
include "koneksi.php";

$kodebuku= $_POST["kode"];
$judul= $_POST["judul"];
$jenis= $_POST["jenis"];
$pengarang= $_POST["pengarang"];
$penerbit= $_POST["penerbit"];
$sinopsis= $_POST["sinopsis"];
$input ="insert into data_buku(kodebuku,judul,jenis,pengarang,penerbit,sinopsis)values('$kodebuku','$judul','$jenis','$pengarang','$penerbit','$sinopsis')";
$query = mysql_query($input);
if (query)
{
echo"<pre>kodebuku:$kodebuku</pre>";
echo"<pre>judul:$judul</pre>";
echo"<pre>jenis:$jenis</pre>";
echo"<pre>pengarang:$pengarang</pre>";
echo"<pre>penerbit:$penerbit</pre>";
echo"<pre>sinopsis:$sinopsis</pre>";
echo "data di atas telah disimpan<br>";
echo "<a href= 'data_buku.php'>back</a>";
echo "atau ";
echo "<a href=' view_databuku.php'> Lihat Tampilan</a>";
}

else
{echo "gagal tersimpan";
echo "<a href=' data_buku.php'>lihat data</a>";

}
?>


6. Buat design untuk menampilkan tb_buku ke tabel seperti dibawah ini :


<table width="880" border="4" align="center" cellpadding="2" cellspacing="1" bgcolor="#FFFF99">
<tr>
<td width="104"><div align="center"><strong>no</strong></div></td>
<td width="86"><div align="center"><strong>kode buku</strong> </div></td>
<td width="115"><div align="center"><strong>judul</strong></div></td>
<td width="72"><div align="center"><strong>jenis</strong></div></td>
<td width="108"><div align="center"><strong>pengarang</strong></div></td>
<td width="103"><div align="center"><strong>penerbit</strong></div></td>
<td width="262"><div align="center"><strong>sinopsis</strong></div></td>
</tr>
<?php
include "koneksi.php";

$perintah="select * from data_buku"; // $ perintah Berguna sebagai variabel penampung //
$hasil=mysql_query($perintah);
while ($row=mysql_fetch_array($hasil))
{
$no++;
?>
<tr>
<td><div align="center"><?php echo $no; ?></div></td>
<td><div align="center"><?php echo $row['kodebuku'];?></div></td>
<td><div align="center"><?php echo $row['judul'];?></div></td>
<td><div align="center"><?php echo $row['jenis'];?></div></td>
<td><div align="center"><?php echo $row['pengarang'];?></div></td>
<td><div align="center"><?php echo $row['penerbit'];?></div></td>
<td><div align="center"><?php echo $row['sinopsis'];?></div></td>
</tr>
<?php } ?>
</table>


Selesai.. ^_^
Read more ►

Tugas Membuat Buku Tamu (Web Design)

0 komentar
Langkah-langkah :

1. Membuat database
Contoh : ade_11080965

2. Membuat tabel
Contoh : tb_tamu

isi field seperti gambar dibawah ini :


3. Buat design untuk input data tamu seperti gambar dibawah ini :


listing input buku tamu sebagai berikut :

<body>
<form id="form1" name="form1" method="post" action="save_bk_tamu.php">
<table width="413" height="128" border="0">
<tr>
<td width="224">nama</td>
<td width="27">:</td>
<td width="165"><label>
<input name="nama" type="text" id="nama" />
</label></td>
</tr>
<tr>
<td>Email</td>
<td>:</td>
<td><label>
<input name="email" type="text" id="email" />
</label></td>
</tr>
<tr>
<td>Komentar</td>
<td>:</td>
<td><label>
<textarea name="komentar" id="komentar"></textarea>
</label></td>
</tr>
<tr>
<td height="21" colspan="2"><label>
<div align="center">
<input type="submit" name="Submit" value="Submit" />
</div>
</label></td>
<td height="21"><label>
<input name="Reset" type="reset" id="reset" value="Reset" />
</label></td>
</tr>
</table>
</form>
</body>


4. Buat koneksi ke database

Listing koneksi :

<?php
$host='localhost';
$user='root';
$pass='password';
$db='ade_11080965';
$ok=mysql_connect($host,$user,$pass) or die ('gagal konek'.mysql_error());
mysql_select_db($db,$ok);
?>


5. Buat Perintah SQL untuk penyimpanan ke database

Listing :

<?
include "koneksi.php";

$nama= $_POST["nama"];
$email= $_POST["email"];
$komentar= $_POST["komentar"];
$input ="insert into bk_tamu(nama,email,komentar)values('$nama','$email','$komentar')";
$query = mysql_query($input);
if (query)
{
echo "<pre> Nama:$nama</pre>";
echo "<pre> Email:$email</pre>";
echo "<pre> Komentar:$komentar</pre><br>";
echo "data di atas telah disimpan<br>";
echo "<a href= 'input_bk_tamu.php'>back</a>";
}

else
{echo "gagal tersimpan";
echo "<a href=' input_bk_tamu.php'>lihat data</a>";
}
?>


6. Buat design untuk menampilkan tb_tamu ke tabel seperti gambar dibawah ini :

listing :

<form id="form1" name="form1" method="post" action="">
<table width="452" border="2">
<tr>
<td width="26">no</td>
<td width="129">nama</td>
<td width="100">email</td>
<td width="179">komentar</td>
</tr>
<?php
include "koneksi.php";

$sqltampil="SELECT * FROM bk_tamu ORDER BY id";
$qrytampil=mysql_query($sqltampil);
while ($row=mysql_fetch_array($qrytampil))
{
$no++;
?>
<tr>
<td><?php echo $no;?></td>
<td><?php echo $row['nama'];?></td>
<td><?php echo $row['email'];?></td>
<td><?php echo $row['komentar'];?></td>
</tr>
<?php } ?>
</table>

</form>


Selesai... ^_^
Read more ►

Script Koneksi.php

0 komentar

Dalam sebuah koneksi dalam php dibutuhkan sebuah script koneksi.php

pada umumnya script-nya adalah sebagai berikut:

<?php
$host='localhost';
$user='root';
$pass='12345678'; //---- Password root ----
$db='latihan_11080962'; // ------ Nama database --
$ok=mysql_connect($host,$user,$pass) or die ('gagal konek'.mysql_error());
mysql_select_db($db,$ok);
?>


Read more ►
 

Copyright © Informasi terbaru Design by O Pregador | Blogger Theme by Blogger Template de luxo | Powered by Blogger